Murals are powerful expressions of creativity that can transform spaces and captivate audiences. One key element that adds depth and realism to a mural is perspective. Mastering perspective techniques allows artists to create the illusion of three-dimensional space on a two-dimensional surface. If you’re eager to bring your mural to life with depth and dimension, understanding and employing perspective is essential.
Understanding Perspective
1. Linear Perspective
Linear perspective involves using lines and vanishing points to create the illusion of depth. There are different types, including:
- One-Point Perspective: Perfect for creating the feeling of depth on a single plane.
- Two-Point Perspective: Useful for depicting objects and spaces at different angles.
- Three-Point Perspective: Ideal for portraying objects from various viewpoints, adding complexity to the scene.
2. Atmospheric Perspective
This technique uses color and value to create the illusion of depth by mimicking how distant objects appear fainter, bluer, and less detailed than closer objects.
Methods for Creating Perspective in Murals
1. Grid Method
- How it Works: Divide your reference image and mural surface into a grid. Enlarge the image by recreating each grid square onto the wall, maintaining proportions and perspective.
- Benefits: Helps maintain accuracy in proportions and perspective.

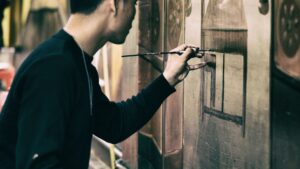
Man In Black Sweatshirt Holding Black Paint Brush Painting the Wall
2. Freehand Drawing
- How it Works: Draw directly onto the wall using a rough sketch to establish perspective. Adjust as needed while painting.
- Benefits: Offers artistic freedom and spontaneity but requires a strong grasp of perspective principles.
3. Layering Technique
- How it Works: Begin with background elements, gradually adding layers of detail and adjusting size and opacity to convey distance.
- Benefits: Allows for easy adjustments and enhances the illusion of depth.
Tips for Achieving Realistic Perspective
- Study Perspective: Practice drawing simple shapes and scenes to understand how perspective works.
- Use Reference Images: Refer to photographs or real-life scenes to observe how perspective operates in different environments.
- Play with Scale and Foreshortening: Experiment with the size and positioning of objects to create a sense of depth and distance.
- Blend Colors for Atmospheric Perspective: Employ lighter and cooler tones for distant objects and darker, warmer tones for closer elements.
External Resources for Further Learning:
- Smithsonian Magazine – The Art of Perspective: The Ultimate Guide for Artists of Every Level
- Artists Network – Understanding Perspective: Create Depth and Realism in Your Drawings
- The Metropolitan Museum of Art – How to Draw in Perspective: An Overview of Perspective Drawing
Mastering perspective in murals takes practice and patience, but it’s a rewarding skill that elevates your artistry. Experiment with these techniques, adapt them to your style, and watch as your murals come to life, inviting viewers into immersive worlds of depth and wonder.
let’s dive further into refining those mural perspectives
Troubleshooting Perspective Challenges
1. Distorted Proportions
- Solution: Regularly step back and view your mural from a distance to identify disproportionate elements. Make adjustments accordingly.
2. Inconsistent Vanishing Points
- Solution: Ensure that all lines align with the correct vanishing points to maintain a cohesive perspective throughout the mural.
3. Lack of Depth
- Solution: Utilize shading, highlights, and contrast to emphasize depth and create a sense of distance between foreground and background elements.
Experimenting with Perspective Styles
1. Forced Perspective
- How it Works: Manipulate scale and proportion to create optical illusions, making objects appear larger or smaller than they are.
- Example: Painting a tiny door that, when viewed from a certain angle, seems regular-sized.
2. Fisheye Perspective
- How it Works: Mimic the distortion of a fisheye lens, bending lines and exaggerating perspectives for an unconventional and dynamic effect.
- Example: Stretching or curving elements to create an immersive and distorted scene.
Maintaining Consistency Across Large Surfaces
1. Planning and Sketching
- Tip: Create a detailed sketch or digital mockup before starting the mural. This serves as a guide and ensures consistency across the entire piece.
2. Breaking the Mural into Sections
- Tip: Divide the mural into manageable sections, focusing on one area at a time to maintain focus and avoid overwhelming yourself.
Conclusion
Perspective is the backbone of a captivating mural, guiding the viewer’s eye and immersing them in your artistic world. Whether you opt for precise linear techniques or adventurous optical illusions, mastering perspective adds depth and realism to your murals, transforming blank walls into captivating stories.
The key lies in practice, observation, and a willingness to experiment. Embrace the challenges, learn from mistakes, and watch as your mural artistry flourishes, inviting awe and wonder from everyone who encounters your masterpiece.
Comparison tabular
| Technique | Description | Advantages | Challenges |
|---|---|---|---|
| Grid Method | Divide mural and reference into a grid, replicating each grid square onto the wall while maintaining proportions and perspective. | – Maintains accuracy in proportions and perspective.
– Helps in scaling up or down reference images effectively. |
– Can be time-consuming to transfer grid details onto a large wall.
– Limits artistic spontaneity and creativity. |
| Freehand Drawing | Directly draw onto the wall, using a rough sketch as a base, allowing for adjustments during painting. | – Offers artistic freedom and spontaneity.
– Allows immediate adjustments while painting. |
– Requires a strong grasp of perspective principles.
– May lead to inaccuracies if perspective isn’t well understood. |
| Layering Technique | Start with background elements, adding layers of detail while adjusting size and opacity to convey distance and depth. | – Facilitates easy adjustments.
– Enhances the illusion of depth through layering. |
– Requires careful planning to ensure elements are positioned correctly for depth.
– Can be complex, especially with intricate murals. |
These techniques offer various approaches to achieving perspective in murals, each with its own set of advantages and challenges. The choice often depends on the artist’s preference, style, and the specific demands of the mural project.
Wrapping up
In the vibrant world of mural painting, mastering perspective is like wielding a magical brush that breathes life and dimension into your artistic vision. From the meticulous precision of the grid method to the daring spontaneity of freehand drawing and the nuanced layering technique, each approach opens doors to captivating worlds waiting to adorn walls.
Remember, there’s no one-size-fits-all technique. Embrace experimentation, learn from challenges, and let your creativity soar. Whether you’re transforming a blank wall into a breathtaking landscape or infusing an urban space with dynamic illusions, perspective serves as your guiding light.
So, grab your brushes, envision your masterpiece, and let perspective be your ally in creating immersive and awe-inspiring murals that enchant hearts and ignite imagination.
Do you need more guidance or tips on a specific aspect of mural painting or artistry? Feel free to ask down below.

For over a decade, I’ve been Mike, an artist, crafter, and designer deeply immersed in the Croc world. I thrive on crafting unique, size-inclusive patterns, fostering creativity, and sharing them on ktforum.com. My designs aim to ignite your creative spark and delight you, ensuring clarity and ease of use through rigorous testing. Join me in expressing your creative flair and showcasing your craft with joy.
Related Posts
- Was the 2pac mural a part of a larger art project
The iconic 2Pac mural that graced walls in various cities wasn't initially part of a…
- Creating a Cohesive Mural: Blending Art with Surroundings
When it comes to murals, their impact goes beyond just the art they can transform…
- Protecting Murals from Vandalism: Effective Strategies
Murals are vibrant expressions of creativity and community, adding color and character to our surroundings.…
- How to create depth and dimension in the mural
Mural painting is an incredible way to transform spaces, adding life and vibrancy to walls.…

